Add and move items
Instructions on how to add assets to a collection or move them between collections and folders. Explorer provides a similar usage method to File Explorer with a list table, tree, and right-mouse menu.
Add Item Menu — Resource Creation and File Upload
When you select a collection/folder node, the Add item ▾ button (+ icon) appears in the detail header on the right. From this dropdown you can create folders and resources, upload files, and link existing resources.
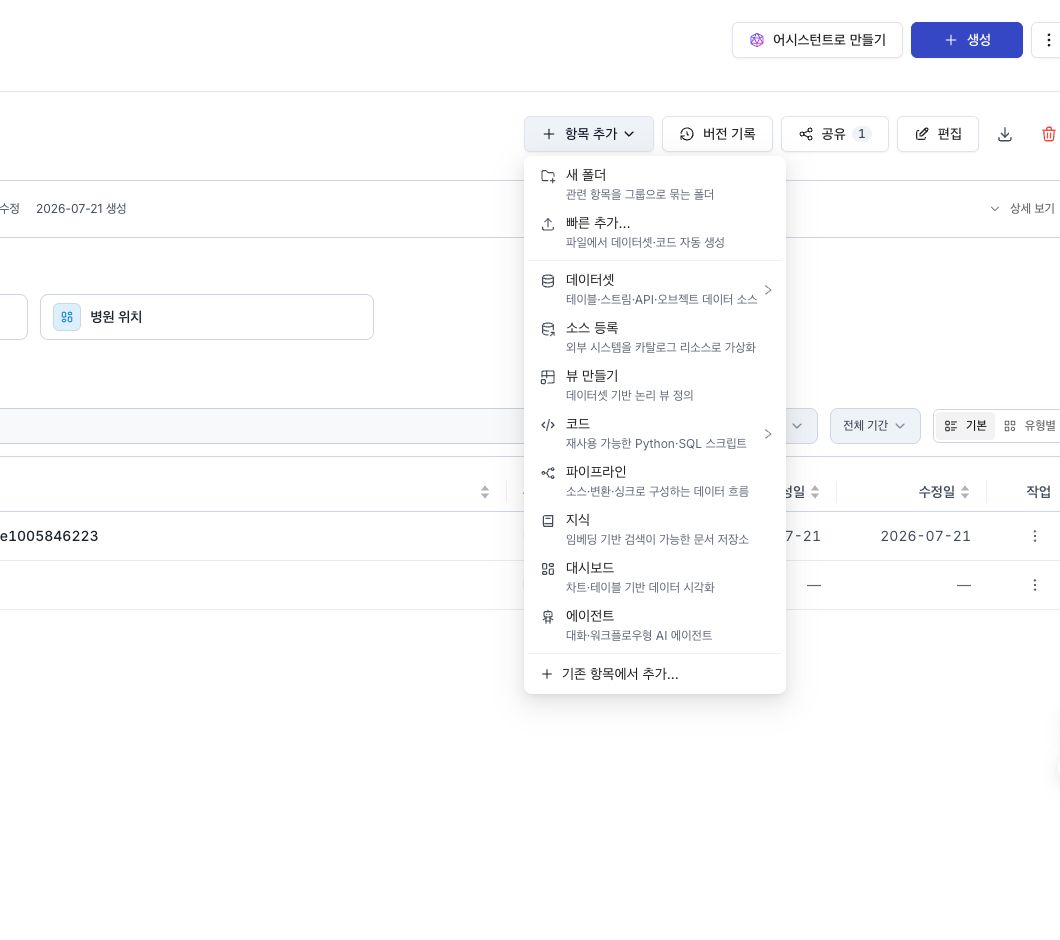
The menu is organized in the following order:
| Item | Description |
|---|---|
| New folder | Creates a folder in the current location. Eight asset types can be placed in a folder. |
| Quick add… | Upload a file to automatically generate a dataset or code resource (see Quick Upload below). |
| Dataset | Create a dataset with the template wizard. Select delta / kafka / rest / object subtype from the submenu. |
| Register source | Create a source that connects an external data system to the collection. |
| Create view | Select a source table and configure exposed columns and filters in a view. |
| Code | Create Python or SQL code resources. |
| Pipeline | With the collection/folder context specified, go to the pipeline editor. |
| Knowledge | Create a knowledge base (followed by document upload/crawl flow). |
| Dashboard | Create a dashboard in the selected collection or folder. |
| Agent | Create an AI agent or workflow in the selected collection or folder. |
| Add from existing items… | Link existing resources to this collection (see Adding an existing asset to a collection below). |
Label each item as a noun phrase (e.g. “dataset”, “pipeline”) rather than a verb.
Sources and views appear in the collection tree but not in the central item table for a collection or folder. See Sources and views for creation and configuration.
Quick Upload (drag and drop + header editable preview)
Dropping the file directly is fastest. The + Add item ▾ → Quick add… menu opens the same dialog.
- Select the target collection or folder from the tree on the left.
- Drag and drop files (CSV / Parquet / JSON / Python / SQL) onto the right panel or tree node.
- Files are automatically classified based on extension.
.csv·.parquet·.jsonare registered as dataset, and.py·.sqlare registered as code. - Tabular files such as CSV and JSON open in a header-editable preview of the first few rows. You can change column names immediately.
- Headers that do not meet schema field-name rules are highlighted. For non-empty headers, select AI: Generate column names from headers to apply suggestions to all invalid column names at once, or edit them manually. Enter empty headers manually.
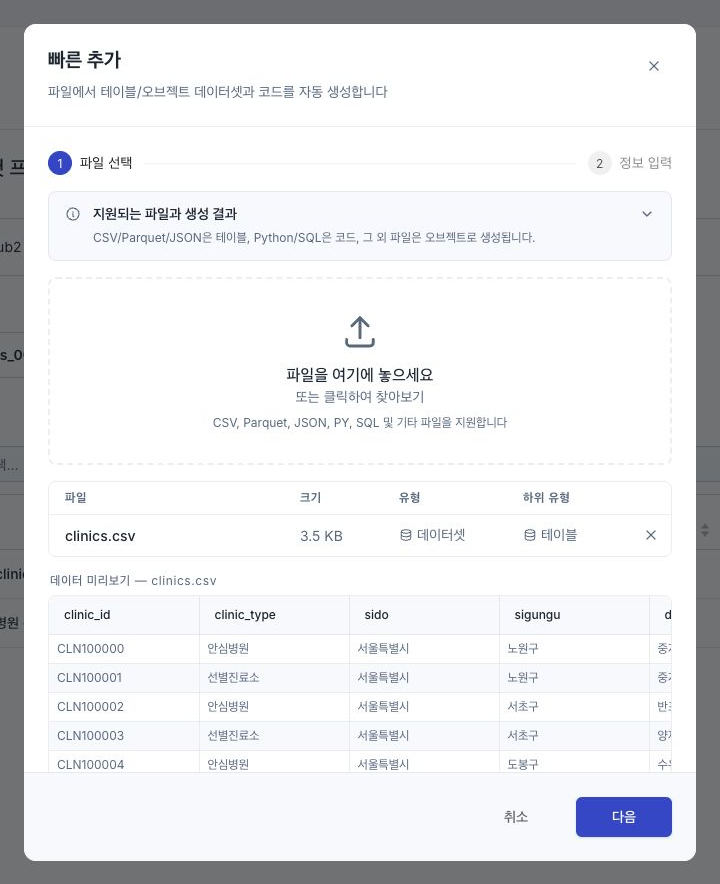
You can select multiple files at once, with a maximum size of 500MB per file. For JSON files larger than 50MB, column names cannot be corrected automatically, so edit the headers before uploading. For large collection transfers, use ZIP import and export.
Adding an existing asset to a collection
Used when connecting assets already registered in D.Hub to a collection. Create uses the Add item menu above, and Existing Connection uses the dialog box below.
- Select the target collection from the tree on the left.
- In the detail header, select + Add item ▾ → Add from existing item….
- The Item Management dialog (Common Item Selector) opens (Title:
Manage items: {collection name}).
The dialog box provides the following features:
- Type tab: Filter by All / Dataset / Code / Pipeline / Knowledge tabs (Dashboard·Agent is not covered by this selector).
- Search: Search for assets by name or nickname.
- Hide added items: Checkbox to hide assets already included in the collection. Default is on, so only the assets that can be added are initially visible.
- Checkbox Multi-Selection: Select multiple assets at once. Selecting an asset that can be added will be processed as Add, and selecting an asset already in the collection will be processed as Remove.
The bottom summary shows Add {n} • Remove {m}. Click Apply Changes to reflect them.
To remove assets that are already included, turn off Hide Added Items (use the Show all link that appears when empty) or show the current members, then select the assets you want to remove and press Apply Changes. This action only disconnects the collection and does not delete the asset itself. For more information, see the Item Removal section in Collection Edit.
Move by dragging and dropping in the tree
In the collection tree, drag and drop datasets, sources, views, code, pipelines, knowledge, dashboards, and agents.
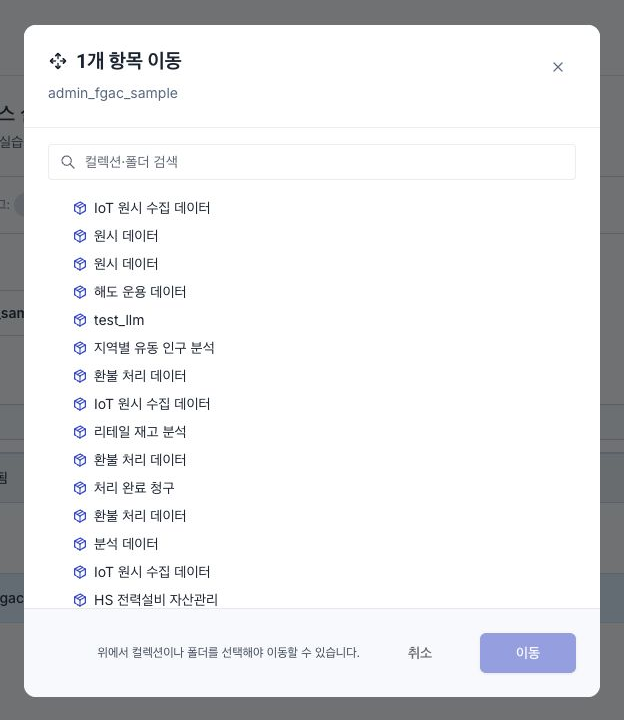
- Drag an end item or folder from the tree onto the target folder/collection.
- When the drop position indicator appears, release your hand to confirm the move.
- Movement is handled by the server. If the server authorization verification passes, it is reflected and the tree and table are synchronized. If the server rejects it, the move will fail.
Movement between collections of the folder itself is not supported (resource unit only). It is possible to move to another folder within the same collection.
Moving through the Explorer list table
When you select a collection/folder, a table opens on the right panel showing the folders spread out like one page, allowing you to select and move multiple items at once like in a file explorer.
- In the table, select the checkboxes of the assets you want to move (multiple are possible).
- Click
Moveon the top batch action bar (the batch action bar only provides movement and deletion). - Select the destination in the Path Picker dialog (searchable Collection → Folder tree). Locations that already contain the selected asset will be disabled and cannot be selected.
- After confirming
Move, transfer the assets one by one. Assets rejected by the server will be marked as Failed, and if only some fail, the dialog will remain and you can try again.
Since all six types of path pickers are supported, you can select them once and move multiple types of resources to the same folder at once.
Go to context menu
- Asset: Right click →
Move - Folder: Right click →
Move(moving between collections of the folder itself is not supported; movement is only possible to other folders within the same collection)
Create a right click
Right-click a collection or folder in the tree to open the create menu. You can create all eight asset types, including Source, View, Dashboard, and Agent. Sources and views are initially saved at the selected collection's root; other assets are saved at the selected location. To place a source or view in a folder, move it in the tree after saving.
Change name (alias)
- You can edit the alias by selecting
Renamefrom the context menu of the collection, folder, or asset. - The alias is the display name that will be shown to users, and the system name (name) is maintained as an identifier.
- In breadcrumbs and lists, the alias is displayed first, and if there is no alias, the system name is displayed.
duplicate
Right-click the Dataset/Code/Pipeline/Knowledge row → select Duplicate to open the Duplicate dialog box.
- New name: Start with a lowercase letter and use only lowercase letters, numbers, and underscores (
_). Datasets can be up to 63 characters long, and code, pipelines, and knowledge can be up to 128 characters long. - Target collection: Select the collection where you want the replica to reside (default is the current collection). You can also specify an alias, description, and tag.
- Alias is suggested by default as the original alias followed by
_copy, and a unique suffix is automatically added to the system name to avoid conflicts.
When replication is complete, the target collection is refreshed and the replica appears in the list.
Delete
- Delete asset: Right click →
Delete. In the Confirm Delete dialog box, confirm by entering the asset name as is. Long-running cleanup operations, such as datasets, display progress asynchronously in a floating panel (see Cleanup Panel article). - Delete folder: Select how to handle contents in the Delete Folder dialog box.
- Move content to parent (default): Moves subfolders and assets up one level and deletes only the folder.
- Delete folder and all contents: Permanently deletes all nested folders and all resources within them (dataset, pipeline, code, knowledge, dashboard, ontology entity/relationship, agent). This option requires you to enter a folder name to confirm.
- Delete Collection: When you delete a collection, its child assets are always permanently deleted; there is no retention option. For the full procedure, see Edit a collection.
Reference Warning
Deleting a collection automatically returns external reference checking. If other resources (pipelines, ontology relationships, etc.) reference assets in this collection, a warning and a list of references are displayed. This pre-check is not present when deleting individual assets, so check the reference relationships in advance.