Create and manage datasets
Create a dataset for the required storage or connection method, then manage its schema and data in a collection. After creation, use the detail screen to upload data or review connection status and version history.
Dataset subtypes
D.Hub datasets have four storage-based subtypes (type). Select the subtype during creation. Values outside this list cannot be registered.
Subtype (type) | Description |
|---|---|
delta | A versioned table that supports file uploads and pipeline loading. This is the default. |
kafka | Collects data from a real-time message stream. |
rest | Connects an external REST API as a data source. |
object | Registers a file or object-store object as a unit of data. |
The subtype cannot be changed after creation. The legacy table subtype has been retired.
Create a dataset
- In a collection or folder, select Add Item ▾ → Dataset, then choose a subtype.
- Under Basic Information in the Create dataset dialog, enter the name, alias, description, and tags. If you opened the dialog outside a collection, also select the destination collection.
- Complete the fields for the selected subtype.
delta: Under Load method, select Empty table or Load PostgreSQL changes. To load PostgreSQL changes, select an existing Data Connection or enter connection information directly.rest: Enter one or more URLs.kafka: Optionally enter a topic.object: Enter only the basic information. Upload files from the detail screen after creation.
- For every subtype except
object, select Next and define the schema. Add columns in the table or paste JSON. You can also infer the schema from a CSV file. - Select Create. For a
deltadataset that still has the defaultfield1column, the button reads Create with temporary schema.
The dataset appears in the list and tree for the selected collection or folder. You cannot change the selected subtype in the dialog. When opened from a collection or folder, the save location is also fixed.
Dataset detail screen
Select a dataset in the collection tree to open its details in the right panel. The detail screen contains these tabs.
| Order | Tab | Contents |
|---|---|---|
| 1 | Overview | Review and edit basic information. |
| 2 | Schema | Review and edit the column structure. |
| 3 | Data | Query data and run SQL, visualization, and file-upload tasks. |
| 4 | Version History | Preview or restore versions. |
| 5 | Sharing and Permissions | Manage user and group permissions. |
| 6 | Data Access Policy | Configure column- and row-level access. |
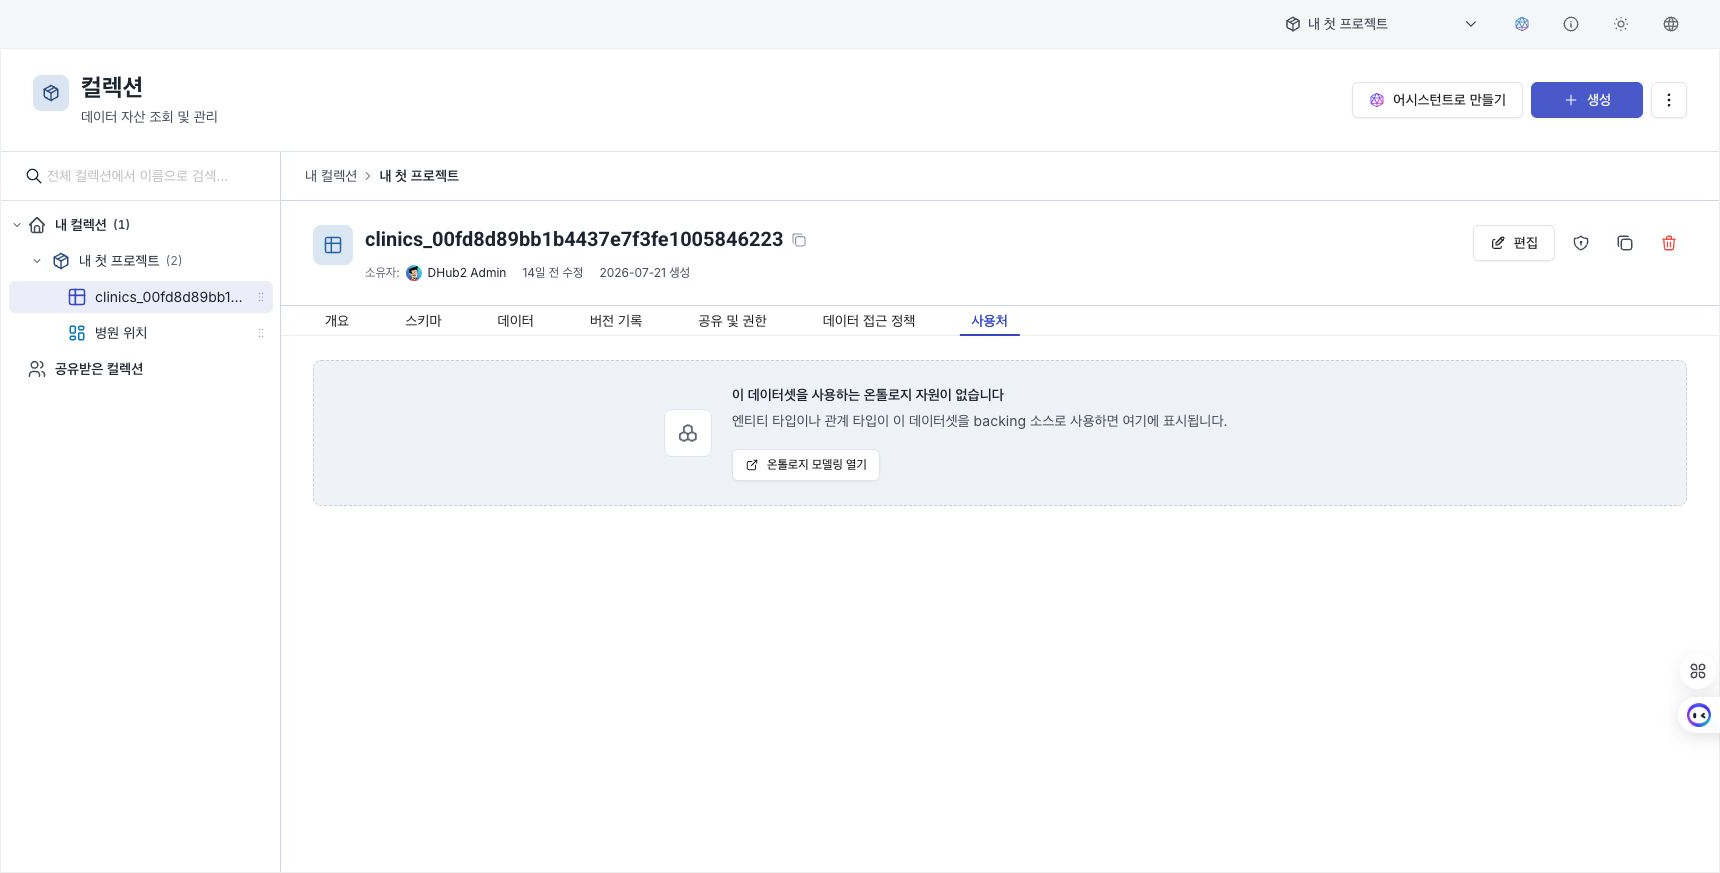
| 7 | Used By | List entities and relationships that reference this dataset. |
Overview tab
Review dataset metadata and change selected fields in Edit mode.
| Field | Description | Editing |
|---|---|---|
| Name | Unique dataset identifier | Cannot be changed after creation |
| Alias | Name displayed to users | Editable, with AI suggestions |
| Type | One of delta, kafka, rest, or object | Cannot be changed after creation |
| Tags | Used for search and classification | Editable, with AI suggestions |
| Description | Records the dataset's purpose | Editable, with AI suggestions |
| Collection / ID | Collection and system ID | Copy the ID with the copy button |
| Created and modified | Author and creation or modification time | Cannot be edited |
A rest dataset also shows one or more URLs. A kafka dataset shows its topic information.
Schema tab
Review and edit the dataset structure on the Schema tab. An object dataset does not have schema editing controls.
- Row-based column list: Each row shows a column's name, alias, description, data type, and whether
NULLis allowed. An icon before the data type distinguishes text, numeric, temporal, Boolean, and other groups. - Select a data type: Browse by group or search. Each type also shows its native name, such as
int32. Turn on Show native types to display Arrow type names. - Constraint badge: Toggle NOT NULL / NULL allowed as a badge in each row.
- Reorder columns: Drag rows or use the arrow keys.
- View mode: Switch between the editing view and raw JSON definition with Table / JSON in the header.
- Edit schema: In edit mode, add columns and change the name, alias, description, type, and nullability. For a
restdataset, specify a JSONPath for each column. If a column already contains data, its name, type, and nullability are locked; only its alias and description remain editable.
Dataset schemas do not have primary key (identifier key) or display column concepts, so their badges and selection menus do not appear. Configure primary keys and display columns only in the ontology entity and relationship editors.
A new dataset starts with only the temporary field1 schema. Upload the first CSV or Parquet file on the Data tab to initialize the schema from the file columns.
Data tab
Query and analyze stored data on the Data tab.
- Pagination: Displays 25 rows per page.
- SQL scratchpad: Run temporary queries in a collapsible SQL editor. Only SELECT queries are allowed, and the available table name is limited to this dataset. Open AI code generation with
⌘I(macOS) /Ctrl+I(Windows). Query history is also displayed. - Switch view (table, map, chart): Map view appears when latitude and longitude columns contain valid coordinates. Chart view appears when temporal and numeric columns contain valid time-series data. Switch between table, map, and chart with the corresponding buttons. The map supports marker and heatmap modes.
- Refresh / Download: Reload the latest data or download it as CSV.
- File upload: For
deltaandobjectdatasets, select File upload to add data. See Add data to an existing dataset.
Fill sample data
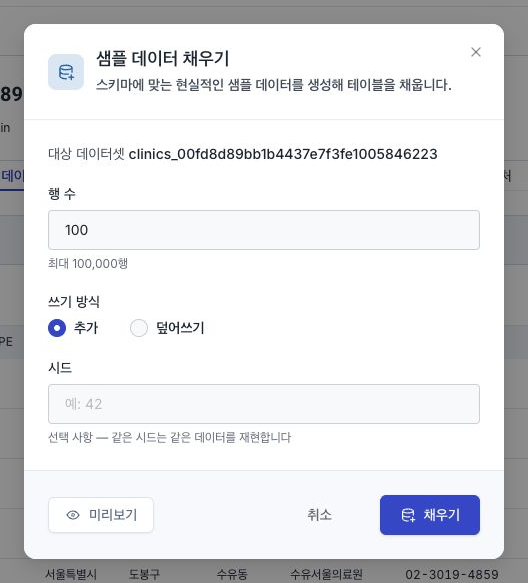
Under Data → Fill sample data for a regular Delta dataset, automatically create rows that match the current schema.

This action is not shown for object, kafka, or rest datasets or a Delta dataset connected to PostgreSQL CDC ingestion. A schema with actual fields is required; with the temporary field1 schema, Define a schema first appears. Read permission is required for preview, and write permission is required to fill data.
- Enter the Number of rows to generate. The default is 100 and the allowed range is 1–100,000.
- Select a write mode. Append retains existing rows, while Overwrite replaces all existing rows.
- To reproduce the same result, enter an optional Seed.
- Select Preview to inspect the first 20 rows without saving them.
- Select Fill to write the data.
If the seed is empty when you preview, the server-generated seed is also used for the fill operation so that the saved result matches the preview. When appending to a dataset with a key column, generated key values continue after the existing generated row count.
Review the impact in the confirmation dialog before continuing. The generated result is recorded as a new data version, so you can restore earlier data under Version History if necessary.
Version History tab
The Version History tab displays data versions first, followed by a separate metadata changes history.
Data versions lists the snapshot created each time data is committed. Each snapshot shows whether it is Latest and its commit time.
- Preview: Select a snapshot to view a limited sample of its data, up to 25 rows.
- Download: Download the selected snapshot with Download CSV or Download Parquet.
- Change summary: When available, shows the number of rows added, changed, and deleted between snapshots. A dataset without row-level summaries displays “No row change summary.” You can still preview and download it.
- If no data has been committed, “No data versions yet” appears. Upload data to create the first snapshot.
Metadata changes tracks changes to alias, type, description, tags, options, and schema separately from data contents.
- Preview: Expand metadata from a selected point in time.
- Restore metadata: Return metadata to an earlier state. This affects metadata only and does not roll back table data. The action is available only to users with permission and requires confirmation.
Dataset versions cannot be compared with each other. Use Preview to inspect the contents of each version.
Used By tab
This tab lists ontology entities and relationships that use the dataset as a source.

- Entities and relationships appear in separate sections. Each item shows its kind, display name, and collection.
- Select Open to navigate to that entity or relationship in Ontology Builder.
- If there are no references, an empty state and a link to Ontology Builder appear.
Review the Used By tab to understand the impact before changing an ontology definition.
File upload
File upload has two paths: create a new dataset or add data to an existing dataset.
Create a dataset by drag-and-drop or Quick Add
Drag a CSV, Parquet, JSON, Python, or SQL file into a collection or folder, or select Add Item → Quick Add.... D.Hub creates a dataset or code asset that matches the extension. See Upload a file with Quick Add for how to revise CSV or JSON headers.
Add data to an existing dataset
Use File upload on the Data tab to add data to an existing delta or object dataset. Before upload, the Review file upload dialog shows schema changes.
- Select files: Choose CSV or Parquet files. Table datasets allow only CSV and Parquet. An
objectdataset stores files as objects without schema validation. - Review schema impact: The selected file schema is inferred, compared with the current dataset schema, and divided into these results:
- New columns: Columns found only in the file. They are added to the schema during upload (schema merge).
- Columns missing from file / type conflicts / conflicts between files: Upload is blocked. Revise the files or edit the dataset schema first.
- If the dataset schema is empty or temporary (
field1), it is initialized from the selected file columns.
- Run upload: Based on the review, the button reads Initialize schema and upload / Merge schema and upload / Upload. After execution, data is loaded and progress appears in the upload progress panel.
You cannot edit headers or generate column names with AI in this dialog. To correct headers, create a new dataset with Quick Add.
Dataset naming rules
A dataset name is a system identifier and cannot be changed after creation. It must follow these rules.
- Begin with a lowercase letter and contain only lowercase letters, numbers, and underscores (
_). - Use no more than 63 characters.
- Do not use analytical-engine SQL reserved words.
As you enter a name, D.Hub checks whether it is already used in the collection. Dataset, source, view, ontology entity, and relationship names share one namespace, so they cannot duplicate each other. A duplicate displays “Already used by a dataset, source, view, entity, or relationship in this collection.” If immediate validation is unavailable, the name is checked again when you save.
Enter a display name, including one in a non-Latin script, as the alias. Aliases do not have these restrictions.
Column naming rules
Schema column names must follow these rules. An inline error appears when a rule is violated.
- Empty name: A column name cannot be empty.
- First character and allowed characters: Begin with a letter or underscore (
_), followed only by letters, numbers, and underscores. Spaces,/,\, other symbols, and non-Latin characters are not allowed. - Reserved words: An analytical-engine SQL reserved word cannot be used as a column name.
- Duplicate names: Column names must be unique within the schema.
Enter a display name, including one in a non-Latin script, as the column alias. Aliases do not have these restrictions.
Supported data types
The schema editor supports the following data types. The default view shows names such as Text and Integer. Turn on Show native types to display Arrow native names.
| Type name | Native (Arrow) | Description |
|---|---|---|
Text | utf8 | UTF-8 string |
Smallint | int16 | Small integer |
Integer | int32 | Integer |
Bigint | int64 | Large integer |
Real | float32 | Single-precision floating point |
Double | float64 | Double-precision floating point |
Numeric | decimal | Fixed decimal with precision and scale |
Boolean | bool | True or false |
Date | date32 | Date |
Time | time32 | Time |
Timestamp | timestamp | Timestamp |
List | list | Array of elements with the same type |
Binary | binary | Binary data |
With native types shown, select either Date32 or Date64. date32 uses days and date64 uses milliseconds.
Column types in uploaded files are inferred automatically. The table lists types you can select directly in the schema editor.
Next steps
- Create and manage code — Prepare code for use in a pipeline.
- Review and restore version history — Review dataset changes and restore an earlier version.
- Add and move items — Add a dataset to a collection.