Create agent
Agents can be created in two modes: AI Agent and Workflow. Pressing the + Create Agent button on the listing page opens the creation window, where the two modes appear side by side as cards — AI Agent (“Chat Interface”) for conversational writing and Workflow (“Visual Flow Editor”) for illustrating flows.
Once an agent's mode is set upon creation, it is fixed and cannot be changed later. If you need a different mode, create a new agent.
AI agent mode
The AI language model (LLM) approaches the goal by repeating the process of selecting the necessary tools, executing them, looking at the results, and then deciding what to do next (this method is called ReAct). It's well-suited for rapid prototyping or tasks that leave a lot of autonomy to agents. (The model settings screen indicates this mode as “ReAct Agent.”)
Main settings
- Model: Select Model Provider → Model in that order. Only registered models you can view appear in the list.
- System Prompts (Instructions): Decide what role the agent will take on and how it will behave. You can write it directly in the input box, or use a pre-made Prompt resource (see System Prompt (Instructions) below).
- Tool / Actor / Agent: Select capabilities and actors that the agent can invoke, and AI agents that it can delegate to.
- Semantic Table / Query Template: Register Semantic Layer assets that the agent will use for natural-language questions.
- Max iterations: Maximum number of times to repeat tool calls. The default is 50, and the range is 1–100.
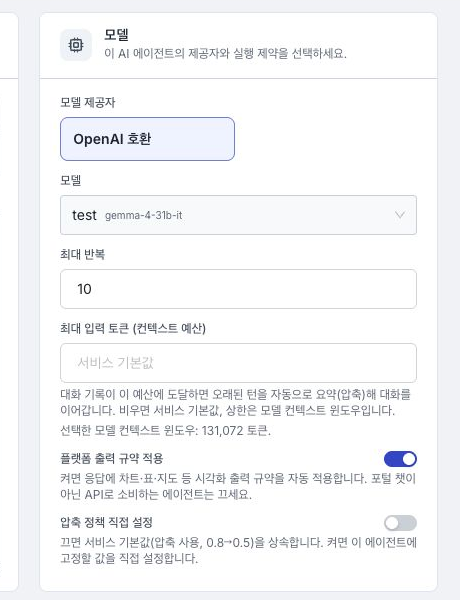
- Maximum Input Tokens (Context Budget): The amount of conversation history (tokens) that the agent will load with one call. When a long conversation reaches this budget, old conversations are automatically condensed (compressed) and the conversation continues. If left blank, the service default value will be used, and the maximum value will be up to the context window of the selected model.
- reasoning effort: Determines how deeply the model thinks before giving an answer: Low / Medium / High (fast ↔ careful). This setting only appears on models that support inference and is not visible on models that do not. The value set in the builder becomes the default value of the agent, and can be changed separately for each conversation in actual conversations (see Agent Deployment below).
Model Selection (LLM Catalog)
The model selection screen shows registered models you can view. The portal does not have a predetermined list of providers.
- When there are no registered models: “No registered models” is displayed, along with the message “There are no registered LLM models. To run this agent, an administrator must first register a model.” This is not a problem, it is normal — model registration is the administrator's job (see future document
Settings → LLM Models). - Unavailable model: If the provider/model you previously selected is no longer in the current catalog, the label will be marked with "(Not available)" and a warning will appear to reselect the currently registered model before saving.
- Response temperature/output maximum token: Do not set in the agent-specific input field. Use the default values for the LLM model registered by your administrator.
Context and output settings
Under model settings, configure the input budget for conversation history, output format, and automatic compaction policy. These settings apply only to AI Agent mode.
Maximum input tokens
- When you select a model for a new agent, Maximum input tokens is automatically set to approximately 80% of the registered model's context window.
- After you enter a value manually, changing the model does not overwrite it. Clear the value to resume automatic tracking.
- The value cannot exceed the model's full context window.
- If context-window information is unavailable, the field remains empty and the runtime fallback of 65,536 tokens is shown.
- A stored value on an existing agent is not recalculated unless you change the model.
Apply the platform output contract
Apply platform output contract is enabled by default for a new agent. It adds shared output instructions that let portal chat interpret visual results such as charts, tables, and maps. Disable it for an external API that does not use D.Hub-specific output formats.
Configure a custom compaction policy
When Configure a custom compaction policy is disabled, the agent inherits the service policy. The displayed service defaults are compaction enabled, trigger ratio 0.8, and target ratio 0.5.
When enabled, the following values are stored for the agent.
| Setting | Default | Range |
|---|---|---|
| Enable compaction | On | On / Off |
| Trigger ratio | 0.8 | 0.05–0.95 |
| Target ratio | 0.5 | 0.05–0.95 and lower than the trigger ratio |
| Maximum summary tokens | 1,024 | 128–8,192 |
When a conversation exceeds the trigger ratio multiplied by the input budget, older turns are summarized to approximately the target ratio. See Context gauge and conversation compaction for the difference from manual compaction in chat.
System prompts (instructions)
The agent's role, limitations, and working style can be determined in two ways, and the two methods can be used together.
- Inline Directive: Write directly in natural language in the System Directive field. You can start right away without any preparation.
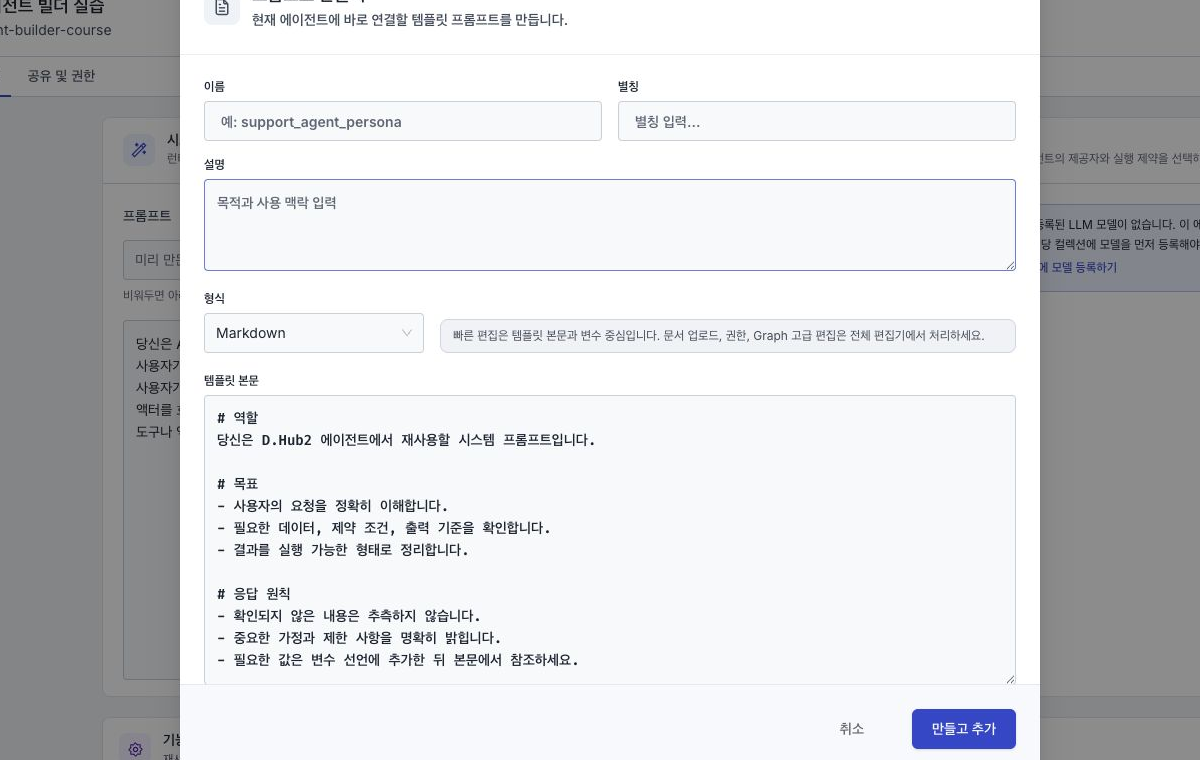
- Prompt Reference: Select and paste the pre-made Prompt resource. Select one or more from Add a pre-made prompt, and you can only select prompts from the same collection (or globally). If you select multiple items, adjust the order by drag to change order.
- New prompt: Create a template prompt in the current builder and select Create and add to connect it immediately.
If you do not select any prompts, only inline directives are used. If you select one or more prompts, when actually running the prompts are followed in list order, followed by inline directives. At this point, the name of the field changes to System Directive (Binded After Selected Prompt) to indicate that the inline directive will not disappear but will follow the prompt. This means that the prompt reference and the inline directive live together, and the inline directive is always valid as a complement to the prompt.
For information on how to create a prompt resource and handle {{variable}}·Render Preview, please refer to Prompt.
From the edit button on a connected prompt, either update the original or create a copy and replace only the current agent's reference. See Quickly edit a connected prompt for the impact on other agents and running deployments.
Capability configuration
The builder's capability configuration contains Tools / Actors / Agents / Semantic Tables / Query Templates tabs. Search for and select assets within the agent collection's scope. To apply changes to a running agent, save and redeploy it.
Delegate to another agent
On the Agents tab, select AI agents that can receive delegated work.
- The current agent itself is excluded from candidates.
- Only AI Agent mode can be selected. Workflow agents are labeled Event execution only and cannot be selected.
- Each candidate shows its collection, execution mode, and model.
- If an existing selection disappears from the current list scope, it remains labeled Not in list. Deselect the item if the reference can no longer be maintained.
- If there are no candidates, use Create agent to prepare one.
This connection differs from creating a separate Agent-type tool. A referenced delegate agent cannot be deleted or have its name or collection changed. Remove the connection from its parent agent first.
Builder screen
In ReAct Builder, model, instructions, tools, and actor settings are divided into tabs for editing. Save and deploy at the top of the builder, and check how the agent moves on the spot with Preview (temporary dialogue on the right panel).
Workflow mode
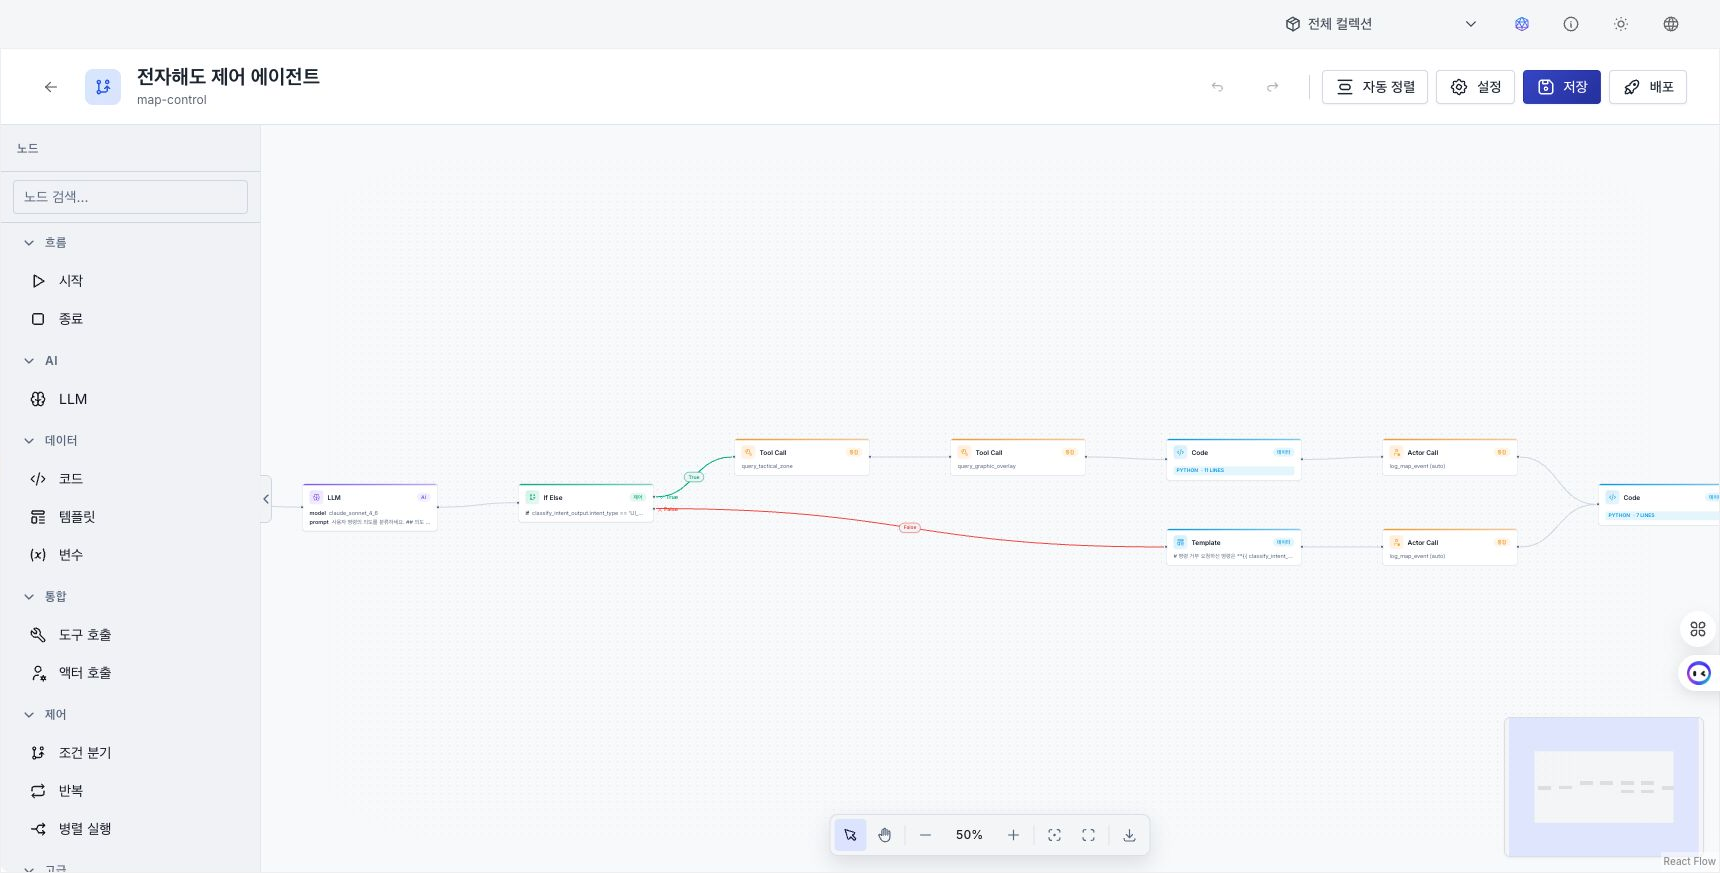
Design complex agents with intertwined branching, conditions, and repetition using pictures (graphs). Each node has only one role, such as calling an AI language model, calling a tool, delegating an actor, or judging a condition, and the connection line connecting the nodes indicates the path through which data flows and the order of execution.
4-zone builder layout
Workflow Builder consists of four areas:
| area | Location | Role |
|---|---|---|
| Action Bar | top | Agent name, save status, undo/redo, auto sort, save, deploy |
| Node Palette | Left | Drag nodes from 6 categories onto canvas |
| canvas | central | Node placement/connection/editing |
| Node Settings (Properties Panel) | Right | Detailed settings panel for selected node |
Node types (6 categories, 12 types)
| Category | node |
|---|---|
| Flow | Start, End |
| AI | LLM |
| Data | Code, Templates, Variables |
| Integration | call tool, call actor |
| Control | Conditional branching, iteration, parallel execution |
| Advanced | Error handling |
Properties panel
When you select a node, its inputs, outputs, and options appear in the properties panel on the right. Tool Call shows an editor that matches the tool input schema. Actor Call configures the actor and input mappings. Because a workflow cannot wait for user approval, its approval policy supports only immediate execution with auto. Use an actor that requires human approval in ReAct mode.
See Workflow agents for node settings, connection constraints, and Start and End deployment validation.
Common metadata
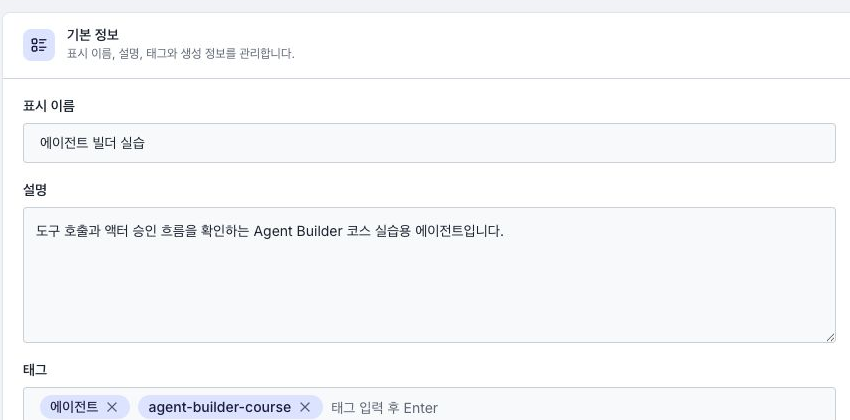
- Name / Alias / Description / Tags: Information used for searching and sorting.
- Owner: Initially, the person who created it becomes the owner, and can make it belong to a specific collection.
- Collection: Select where to store the agent. You can change it later under Basic information.
Changing the collection does not move connected tools, actors, or models. If a reference is unavailable in the new scope, disconnect or replace it before saving. Redeploy a running agent after saving so the new collection and configuration take effect.
AI automatic creation (alias, description, tag)
Based on the name/alias and the configuration so far, AI can create an alias, description, and tag for you. Execute it with the flashing (✨) icon button at the right end of the input field (“Generate description with AI”, etc.).
- Position: Right end of the input field (same location as other resources).
- Create Cancel: The button changes to a stop icon while creating, and you can cancel by pressing the button again or pressing the ESC key.
- Indication of completion of creation: When the value is filled in, the point color in the relevant input box will light up for about 2 seconds and then disappear, indicating that it has just been filled in by AI.
- The same method is also available on the Tool/Actor editing screen, so even if the resources are different, the method of use is the same.
Save
Saving writes the agent definition to the server. To apply those changes to the runtime, save and redeploy the agent (see Agent Deployment). A name or alias change is applied immediately.
Model, context, output-contract and compaction settings, prompts, tools, actors, delegate agents, and semantic assets are part of the runtime definition. When Redeploy required appears after saving, deploy the agent again.