Use D.Hub Assistant
D.Hub Assistant is a chat panel that opens beside the current screen. Mention a dataset, collection, code asset, or pipeline with @, ask a question, and review results such as tables, charts, and maps.
D.Hub Assistant references the current screen and selected assets. AI Chat on a knowledge detail screen references documents collected in that knowledge.
| Area | D.Hub Assistant | AI Chat |
|---|---|---|
| Entry point | Side panel on every page | AI Chat tab on a knowledge detail screen |
| Referenced information | Current screen and metadata for selected assets | Collected document chunks |
| @ mentions | Datasets, collections, code, pipelines | Not supported; use the document filter |
| Results | Charts, maps, and graph nodes | Answer and cited source text |
Open the side panel
Use the AI icon at the right of the screen to open the panel.
- Select the AI icon to open or close the panel.
- Panel width adjusts to the screen layout.
- The panel remains beside the current work screen.
How requests are processed
D.Hub Assistant uses a dedicated assistant service. There is no setting that connects a user-created and deployed agent to this panel.
Run a user-created AI agent from Chat in the Agents list. Workflow agents run from events instead of chat.
User permissions
D.Hub Assistant accesses assets with the signed-in user's permissions. It cannot use an asset that the user is not permitted to access.
Approve changes
D.Hub Assistant turns a natural-language request into a plan to create / update / delete assets. On a Collection, Pipeline, Ontology, Knowledge, or Dashboard list, select Create with assistant next to the primary create button to start with a message that includes the asset type and current collection scope. The same action is available on an empty list.
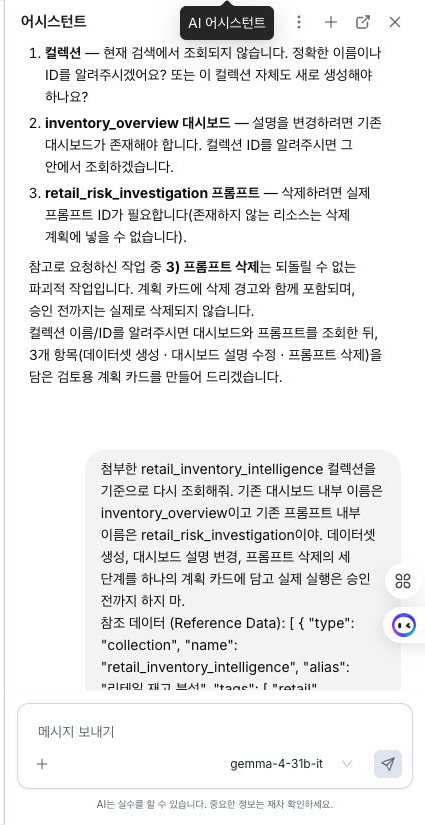
The first browser session also shows a one-time asset-creation notice and Try it next to the Assistant icon.
Supported assets and plan scope
A plan can contain up to 24 items. The following 13 asset types are supported.
Collection / Folder / Dataset / Code / Pipeline / Dashboard / Ontology entity / Ontology relationship / Knowledge / Prompt / Semantic table / Value dictionary / Query template
A later item in the same plan can reference a collection, dataset, or code asset created earlier. For example, one plan can create a dataset, code asset, and pipeline.
Preview and approve
After validating the plan, Assistant displays a read-only Proposed card. No asset is created, updated, or deleted at this stage.
- Review the asset type, target collection, operation, dependencies, assumptions, and warnings.
- For an update, review the difference between the current and new values.
- For a delete, review the displayed impact information.
- Review the initial draft of pipeline steps and connections, dashboard widgets, and code.
When a dashboard creation item has a runnable analysis source and SQL, the plan card previews its widgets with actual data. Expand SQL for each widget to review aggregation and filters before approving the plan. If a preview cannot load, the plan structure and error explanation remain available.
Capture: A dashboard creation plan card showing multiple live widget previews and an expanded SQL section for a widget.
When an approval card for the same plan appears, the preceding preview card collapses. If the plan contains a delete, the approval button uses a destructive-action style. You cannot send another message until you select Approve or Reject. This confirmation differs from an actor's confirmation policy in a user-created agent.
Apply results
After approval, items are applied in dependency order. The result card shows Created / Updated / Deleted / Failed / Skipped and an error for each item.
If one item fails after earlier items were applied, the applied items are not rolled back. When a prerequisite fails, dependent items are skipped. Review successful assets and failed or skipped items separately in the result card.
In the main panel, select a created asset name to open its details. This link is disabled in a detached Assistant window because that window cannot navigate the main screen.
Select a model
Use Model selection to choose the model D.Hub Assistant uses for answers.
Select the model chip at the bottom right of the input area to open the registered model list. Choosing a model applies it immediately. Before selection, the chip reads Select model; afterward, it shows the model name. The selection is saved and remains after a refresh.
To register or manage a model, open More (⋮) → Settings → Model management in the header. In the LLM Models dialog, enter the provider, model ID, API key, and base URL.
Until a model is selected, the input, Send, recommended questions, and Suggest questions are disabled. The input says, “Register and select a model to start chatting.” Select a model from the model chip to enable the input.
The models selected here belong to the D.Hub Assistant list. They are registered separately from LLM Models, which are used by agents, workflows, and Knowledge AI Chat.
Use the current screen as context
D.Hub Assistant answers based on the page you are viewing. After you navigate, the new screen becomes the context for the next question. The answer language follows the interface language.
When the panel opens, it shows recommended questions for the current screen. Select one to send it. Select Suggest questions for another set.
Mention assets with @
Enter @ in the conversation input to open asset search and selection.
Supported asset types
| Type | Icon | Included information |
|---|---|---|
| Collection | Folder | Name, alias, tags, and description |
| Dataset | Database | Basic information and schema |
| Code | Code | Name, language, and collection |
| Pipeline | Network | Name, alias, and collection |
Select assets
- Enter
@in the input field to open asset selection. - Search by asset name.
- Select the asset or press
Enter. - To select multiple assets, toggle each with
Spaceand confirm withEnter.
You can also select + to the left of the input field to open asset selection. This view lists all assets grouped by type.
Selected assets appear as tags above the input. Select X on a tag to remove that asset.
When you @mention a dataset, its schema is included in the AI request. Review generated SQL columns and aggregation conditions before use. For example: “@sales_data Write a SQL query that aggregates monthly revenue from this dataset.”
Render visualizations
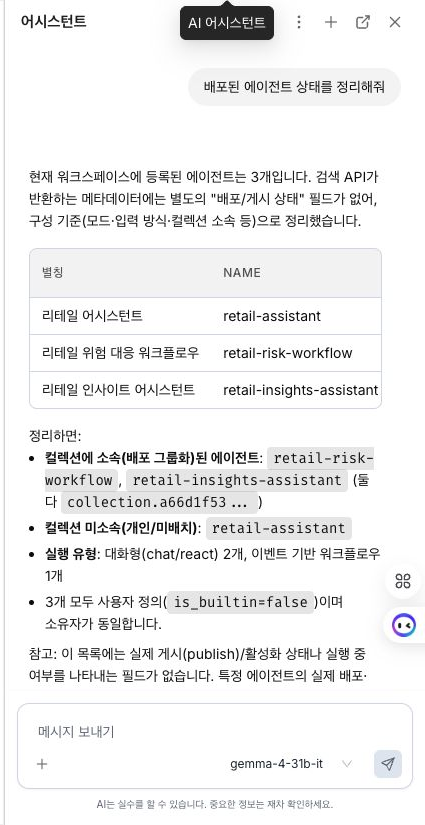
A D.Hub Assistant answer can contain a visualization such as a table, chart, or map.
Supported visualization types
| Type | Description |
|---|---|
| Bar chart | Compares values by category and can stack multiple series. |
| Line chart | Shows a time-based trend as a line or area. |
| Pie / donut chart | Shows the proportion of each item within the whole. |
| Scatter plot | Plots two numeric variables as coordinate points. |
| Table | Displays values in rows and columns. |
| Map | Displays latitude and longitude locations as markers. |
| Knowledge graph | Displays part of the ontology graph used as evidence for the answer. |
| Ontology node reference | Highlights a related node in Graph Explorer. |
Detailed formatting such as axis units and value-axis names can also be included. Visualizations render the same way in the assistant side panel and dedicated agent chat pages.
For a Markdown table with numeric columns, switch between Table / Chart above the table. Select the numeric column under Value, then choose an available Bar / Trend / Treemap / Bubble / Pie view. A temporal column can prioritize Trend, while a percentage column totaling 100% can prioritize Treemap. Select Expand on a wide table to review all columns in a separate dialog.
When a table or chart has an analysis source and SQL, it shows its reference time and Refresh / Add to dashboard / Query. Refresh reruns the same SQL with current permissions. Add to dashboard adds a widget to an existing dashboard in the source collection or creates a new dashboard. Expand Query first to inspect aggregation and filters. These actions are hidden without a source and reproducible SQL.
A knowledge graph used as evidence appears immediately below the answer. Select Expand to pan and zoom it in a separate dialog. On a dedicated agent chat page, select View in source to highlight that section in the full graph.
When an AI answer on an ontology page references an entity, a node reference panel appears below the answer. Select a node to focus it in Graph Explorer. This works only while Graph Explorer is open.
Manage conversations
- Each conversation displays its response time.
- Select Stop to cancel a response being generated.
- Conversations are saved automatically. Close the panel or refresh the page, then reopen it to continue.
Create a report from a conversation: Hover over a completed assistant answer and select Create report in the action row. An approval card uses the conversation through the latest completed answer. Select Approve to start or Reject to cancel. Its result card updates from pending to generating and then completed or failed, and a completed report provides up to 64 preview pages and available PPTX and PDF downloads.
When older messages are summarized near the context limit, a Conversation compacted notice records the compacted range and summary information. It remains when the saved conversation is reopened.
Session history
Previous conversations are stored as separate sessions on your account. Open More (⋮) in the header to view the list under Recents and reopen a conversation.
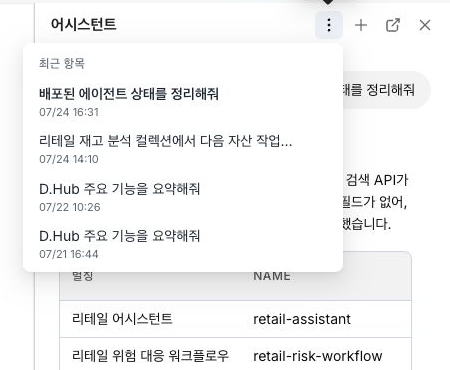
- Each item shows a title and last conversation time (
MM/DD HH:mm). An item without a title appears as Untitled conversation. - Select a previous conversation to load and continue it. The current conversation is highlighted.
- Select New conversation in the header to retain the current one in history and start another.
- Under More for an item, select Pin, Rename, or Delete conversation. A deleted conversation cannot be recovered.
When you separate the panel into a new window, its conversation list remains synchronized with the main panel. Starting, renaming, or deleting a conversation in one window updates the other window's list.
Response progress
Four stages appear while AI generates an answer.
- Thinking
- Searching database
- Processing results
- Generating response
Next steps
- Generate and edit code with AI — Review and apply AI suggestions in the pipeline code editor.
- Use Knowledge AI Chat — Ask questions grounded in collected documents and review citations.