Granular policy editing
The detailed policy editing dialog is a screen that sets column masking and row filter so that the same data appears differently for each target (user/group).
Dialog structure
When you click Add Policy in the Data Access Policies tab or Edit in the list, a window (modal) for entering a policy opens. This window consists of three areas — Select Target → Mask Columns → Filter Rows. There is a Cancel / Save button at the bottom.
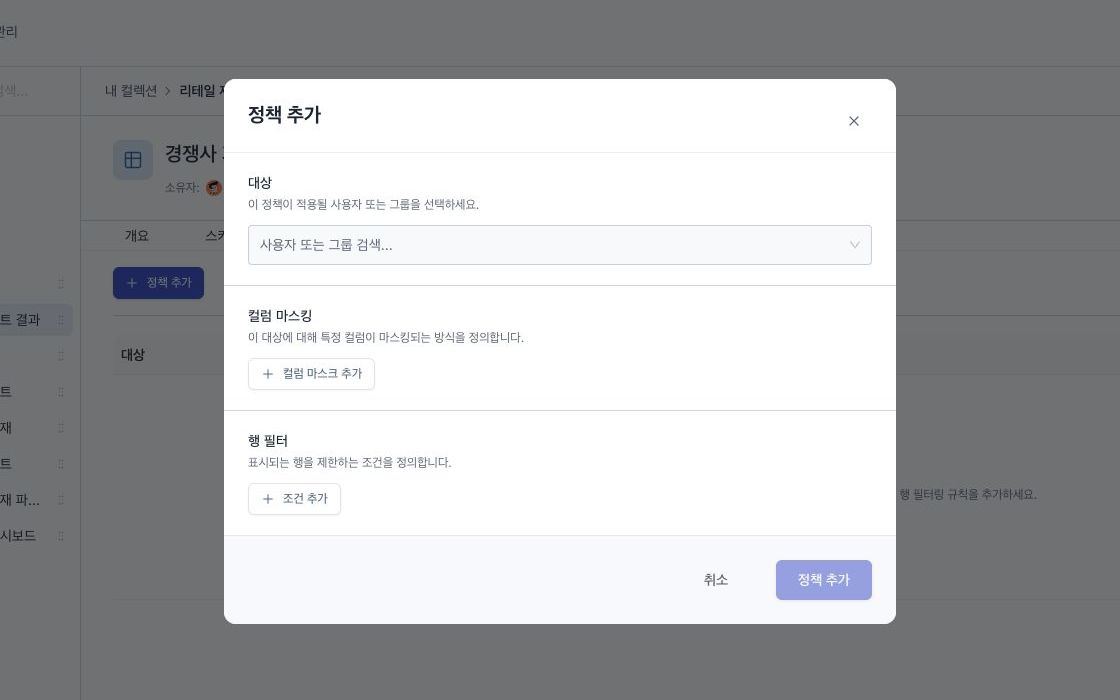
Select subject (Subject)
- Select a target from the Search User or Group selection. Set only one target per policy.
- The search begins when you enter 2 or more characters, and only users and groups within your authority will appear as results. This allows asset owners to immediately perform the routine task of assigning policies to colleagues in the same collection or group without having to delegate authority.
- Target is fixed when editing. To give policies to other targets, add new policies (one policy per target per dataset).
Column Masks
When you click Add column mask, one row will be created, and in each row, select Column and Mask type. Columns are selected from a dropdown based on the dataset schema, so there is no need to enter columns without typos. You can mask multiple columns at once and delete rows one by one.
| Mask Type | Action | Additional settings |
|---|---|---|
| NULL (replaced by NULL) | Show all values as NULL | None |
| Masking (Fixed Text) | Replace value with fixed string | Alt text (default ****) |
| Show only the first N digits | Mask out only the first N digits | Number of digits N (default 4) |
| Show only the last N digits | Masked leaving only the last N digits | Number of digits N (default 4) |
| hash | Replace with hash value | Algorithm (SHA-256 / MD5) |
Row Filters
Click Add condition to create a condition group. Each condition consists of three parts: column · operator · value
- Groups combined method: For each group, select AND (all conditions must match) or OR (only one must match). Add group allows you to create subgroups and nest them (up to 3 levels). There is no separate NOT group.
- Column: Select from the Dataset Schema dropdown.
- Operator: Comparison (
=·≠·>·≥·<·≤), list inclusion (IN· Choose from (NOT IN), range (BETWEEN), pattern search (LIKE), and empty value (IS NULL·IS NOT NULL). - Value: The input method varies depending on the operator.
IN/NOT IN: Enter multiple values as tags (separated by commas)BETWEEN: Two spaces from start value to end valueIS NULL/IS NOT NULL: No value input- Others: Enter a single value
- If you do not add a row filter, it will be treated as No row limit (expose all rows).
Storage and verification
- Save: You can save only when a destination is selected. When saved, the policy is created/updated and the list is updated immediately (
Policy created/Policy updated). - Save Failed: If server verification fails, the reason will be displayed with notification
Failed to save policy.
Delete
When you press Delete in the action menu of a list row, a confirmation modal (Delete this access control policy?) is displayed. If you delete a policy, only role-based permissions will apply to its targets again.
How it works (Summary)
Policies are applied when querying a dataset. When a user searches a dataset, the column masking and row filters of the policy set for the user and the group to which the user belongs are applied, limiting the results.
Limitations
- Policies are applied on a dataset basis and act on data SELECT results.
- To add/edit/delete policies, you must be an administrator or the Owner of the relevant dataset. The system checks policy management permissions with the
deletepermission granted to the owner.